Failure Analysis of a Glass-Filled Phenolic Resin Power-Steering Pump Pulley
Previous Article Next Article
By Michael D. Hayes, Michael E. Stevenson, and Dustin A. Turnquist
Engineering Systems Inc., Atlanta, Georgia, USA
Note: This is an abridged version of the authors’ original ANTEC® Orlando 2015 paper, which won the Dr. Myer Ezrin Best Paper Award from SPE’s Failure Analysis & Prevention Special Interest Group. To see the complete paper and the full ANTEC proceedings, contact SPE customer relations at +1 203-775-0471.

Lead author Michael Hayes receiving the Dr. Myer Ezrin Best Paper Award at ANTEC® Orlando 2015.
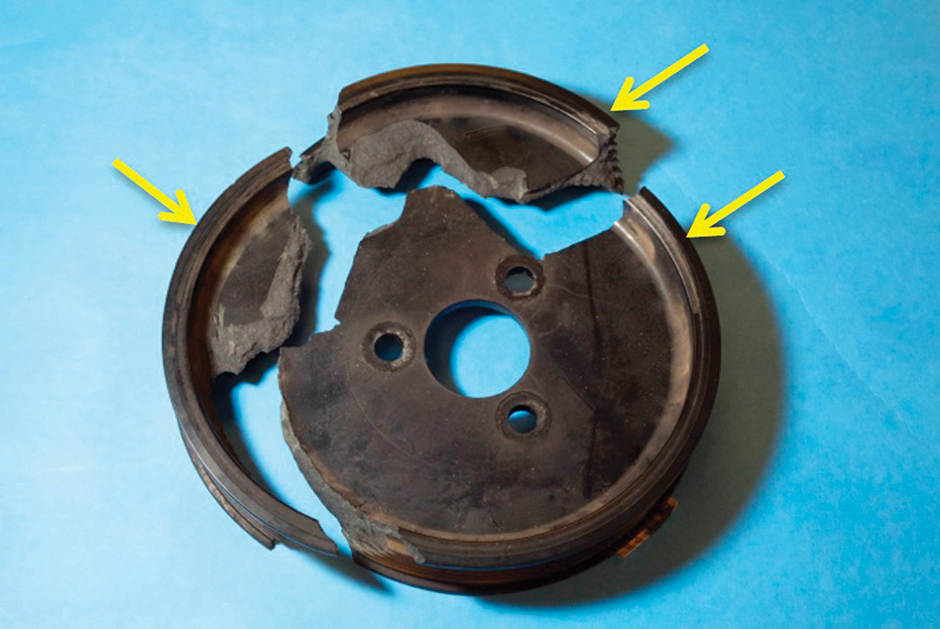
Figure 1: Subject power-steering pump pulley. Witness marks indicated.
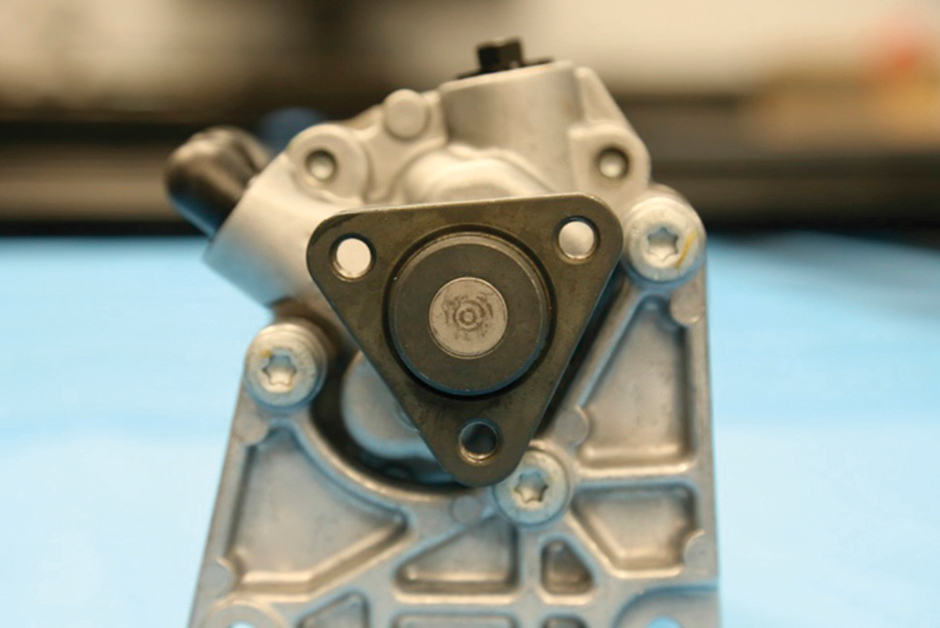
Figure 2: Power-steering pump with triangular mounting plate (pulley not installed).
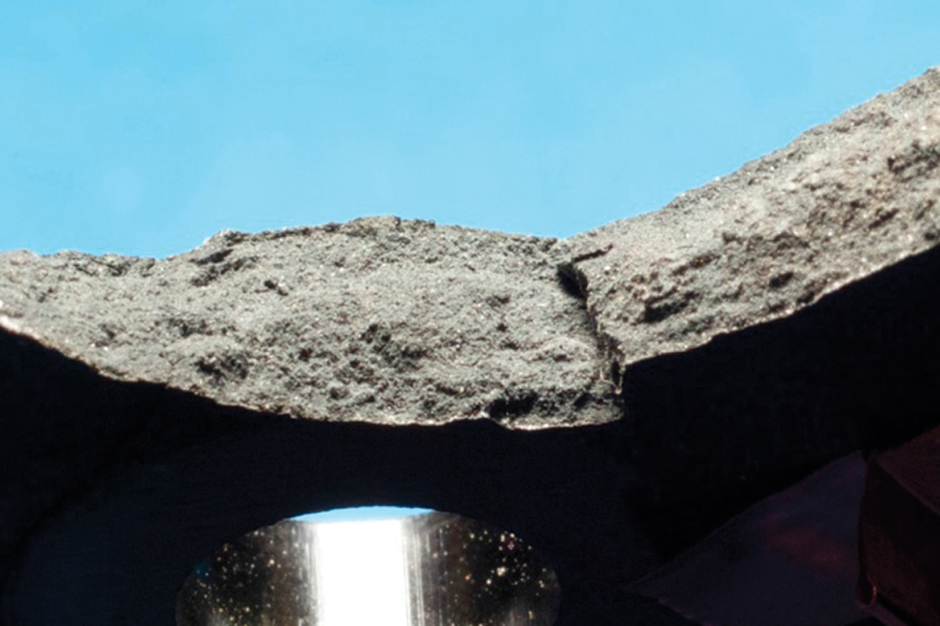
Figure 3: Fracture surface of subject pulley near the likely origin.
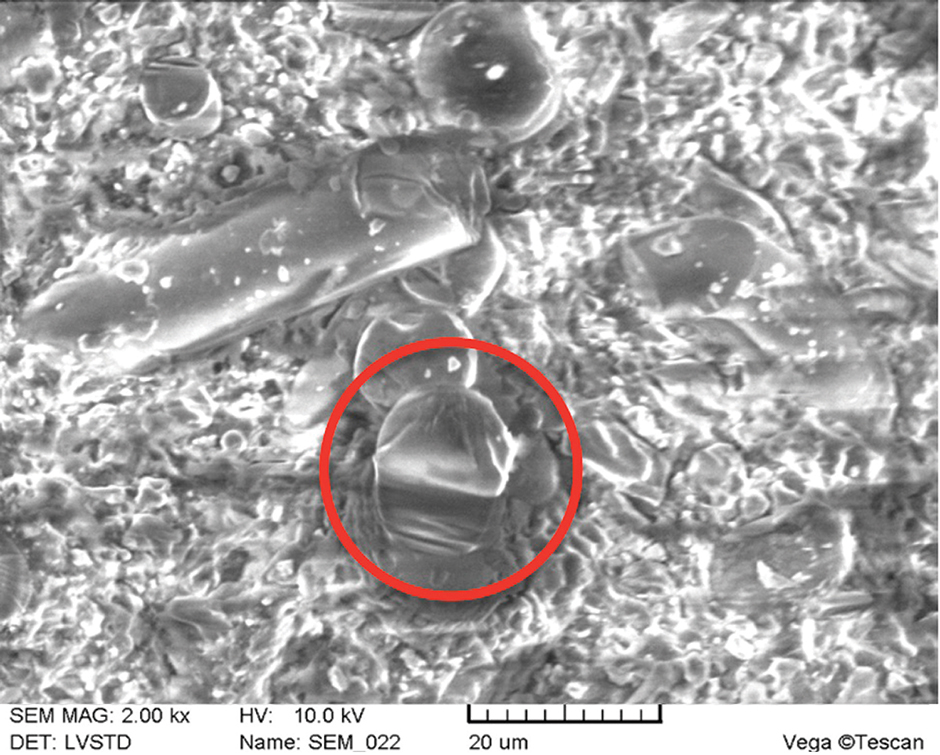
Figure 4: SEM micrograph of the subject pulley fracture surface showing representative fiber fractures.
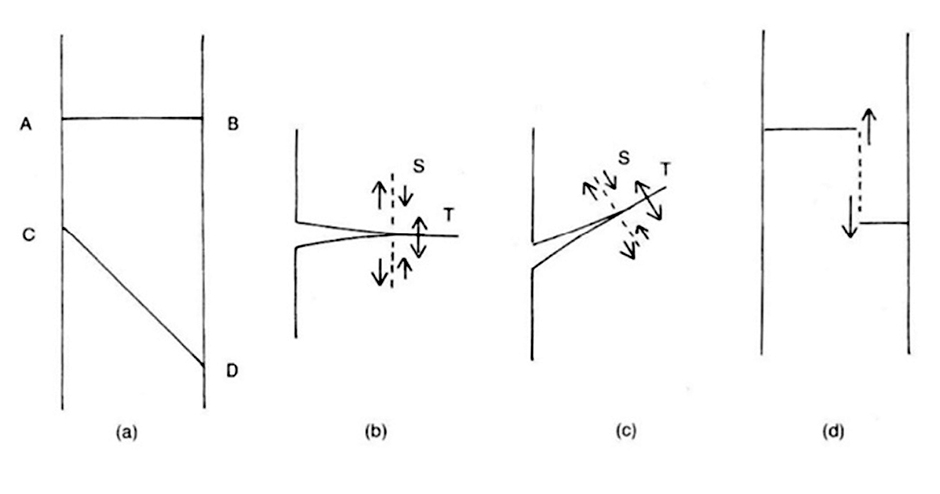
Figure 5: Courtesy of Hearle et al.9
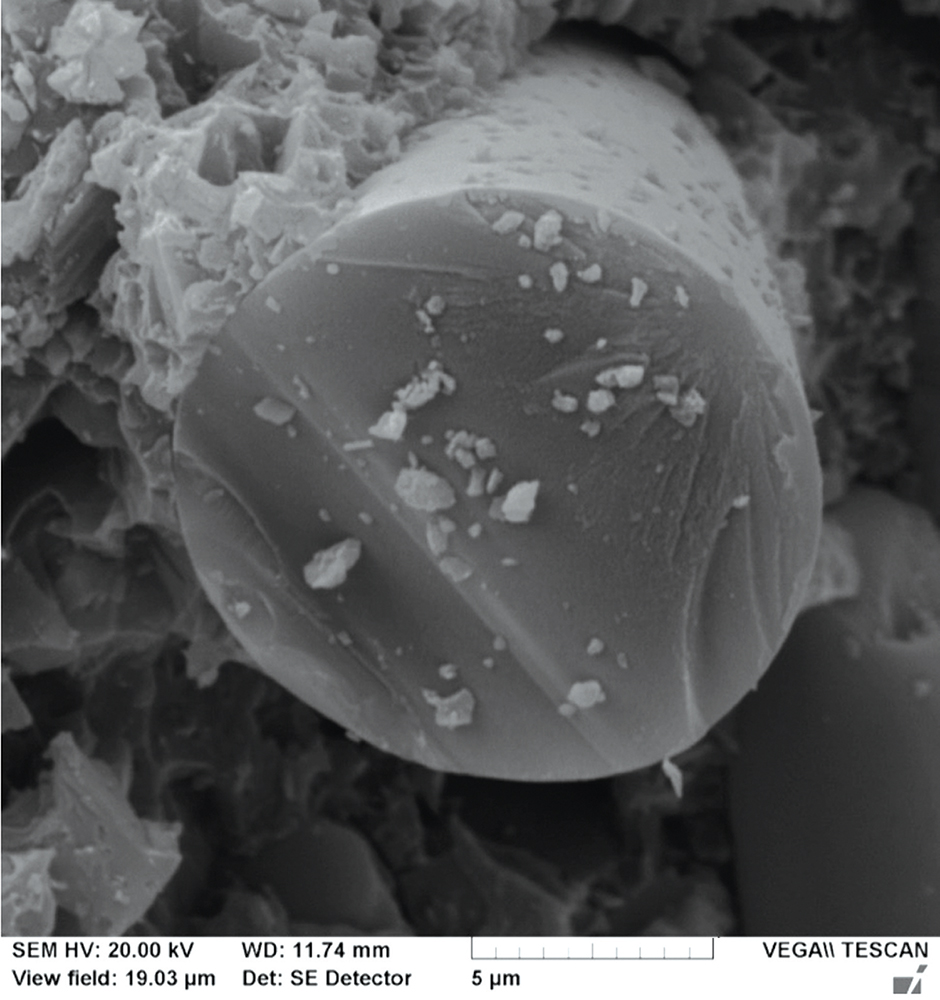
Figure 6: Typical fiber fracture from Charpy impact specimens from an exemplar pulley.
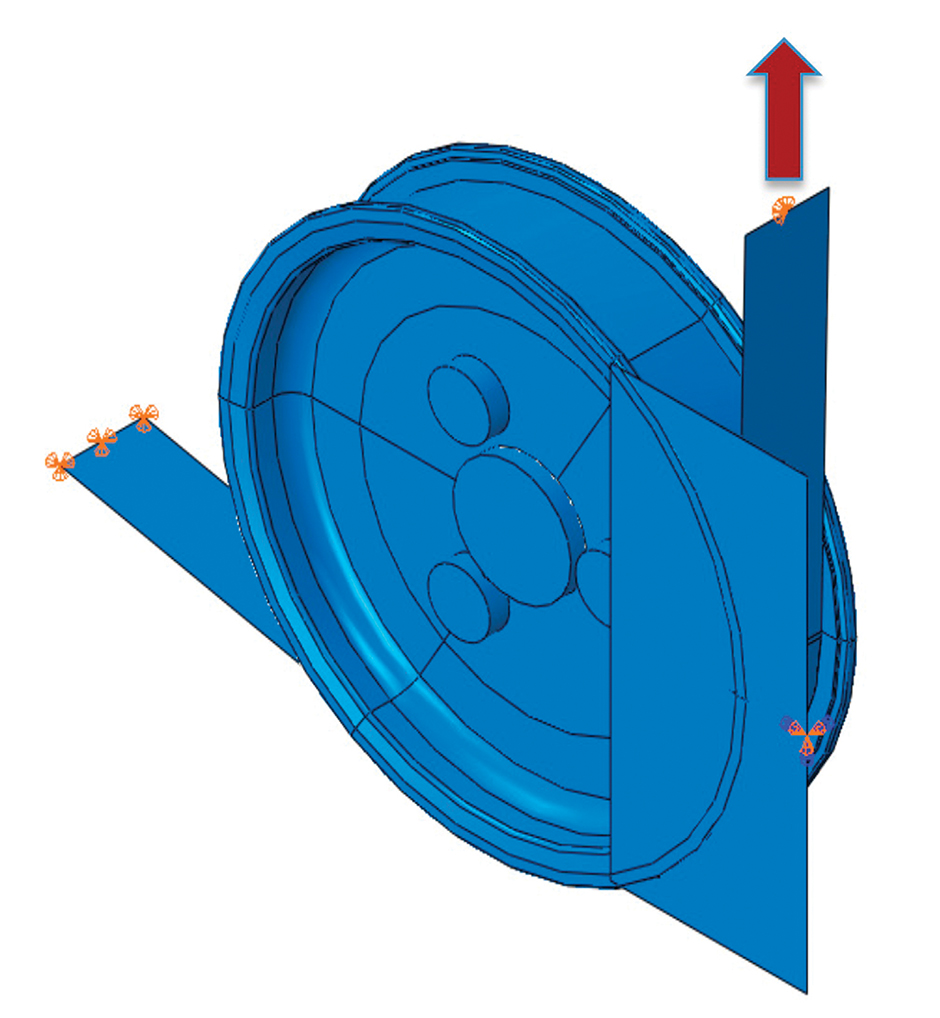
Figure 7: Finite element model. Belt load indicated. The impacted body (overflow tank) is represented as a rigid surface that contacts the pulley along a portion of the outer flange.
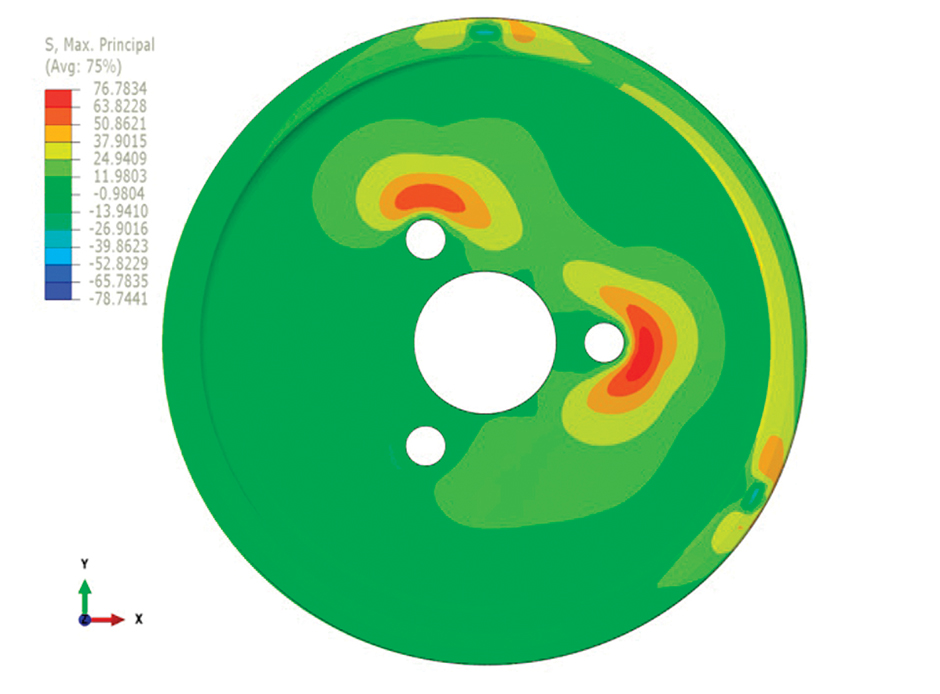
Figure 8: Maximum principal stress distribution for edge loading with the pulley rotated such that the contact points are 30° away from the bolt holes.
The authors investigated the fracture of a power-steering pump pulley associated with a fatal accident involving an automobile. The pulley, shown in Figure 1, is made of a mineral- and glass fiber-filled phenolic thermoset resin (Bakelite). The pulley is mounted onto a triangular steel plate with a center boss that is then mounted onto the shaft of the power-steering pump (Figure 2).
Conflicting witness reports suggest that either a failure caused the vehicle to come to an abrupt stop, or the vehicle was stopped with the engine idling. In either scenario, the vehicle was stationary on the highway when it was struck from behind by an oncoming vehicle that was traveling at or near the posted speed limit. The cause of the pulley failure was disputed in subsequent litigation. One of the investigators argued that the fracture of the pulley induced a sudden loss of power, thereby causing the engine to cease running and precipitating the accident. However, an accident reconstruction expert opined that the engine was idling at the time of impact. This analysis was based on a review of the engine control module (ECM) data.
The authors performed a comprehensive root cause failure analysis, beginning with a visual examination of the subject and exemplar vehicles, as well as macroscopic and microscopic inspection of the pulley. Based on the information gleaned from these inspections, a most likely cause of failure was hypothesized. To test this hypothesis, several additional steps were taken, including Charpy impact testing; literature review; dimensional analysis of the under-the-hood components; stress analysis; static load testing of exemplar pulleys; impact testing of exemplar pulleys to replicate the proposed cause of failure; and mechanical testing of various exemplar components. The details of these steps are provided in this paper. The second hypothesis, discussed in further detail next, was also evaluated using this data.
Visual Examination
Examination of the subject parts revealed several significant findings:
- a macroscopic fracture pattern suggestive of bending loads (e.g., an angled fracture surface);
- witness marks along the circumference of the pulley’s outer flange that spans multiple pieces, as shown in Figure 1, suggesting contact of the pulley with another object;
- damage to the V-belt (not shown);
- damage to the radiator fan shroud (not shown);
- witness marks on the coolant overflow tank (not shown);
- fracture of both the driver’s side and passenger’s side engine mounts (not shown);
- intact transmission mounts; and
- other various damage in the engine compartment.
The damage pattern suggests that the pulley came into contact with the coolant overflow tank and/or the radiator fan shroud during the incident. Damage to the engine mounts confirms that the engine could have displaced forward to cause the contact, and this motion was possibly associated with the vehicle coming to an abrupt stop after impact due to substantial damage resulting from the rear-end collision. The continuous witness marks across multiple pieces of the pulley also suggest that the pulley was rotating during the impact. This observation contradicts the allegation that the pulley failure occurred prior to the impact.
Microscopy
Next, the subject pulley was examined in greater detail using a stereomicroscope (Figure 3) and a scanning electron microscope (SEM). Little to no fractographic detail in the phenolic resin matrix was discernible. This is not unusual for highly filled resin. The fracture surfaces of individual fibers were also studied. The fracture surface of the glass fibers demonstrated classical mist, mirror, and hackle features indicative of brittle fracture, as shown in Figure 4. No evidence of features that can be attributed to fatigue, environmental stress cracking, or chemical attack was observed.
However, another party argued that the hackled portion of the fracture surface on some of the glass fibers was actually a second crack origin growing from the opposite side of the glass fiber, and they attributed this two-sided crack propagation to fatigue.
This interpretation is flawed for two reasons. First, such a phenomenon would require loading individual fibers in reversed bending, which is unlikely given the geometry and loading. Second, the appearance of the alleged second origin can be explained as follows. During tensile loading of a fiber within a composite, tensile and shear stresses (and strengths) compete. Typically, the crack initiates and grows perpendicular to the long axis of the fiber, but in some cases, shear dominates and the crack grows on an angle, i.e., normal to the direction of shear stresses. This is illustrated in Figure 5. The result can be a hackle zone that is not planar with the origin, but rather angled.8
To further illustrate this principle, the authors performed an impact test following ASTM D6110-10 (Charpy impact)18 on an un-notched coupon of material cut from the flat disk web section of an exemplar pulley. A fracture surface on a representative glass fiber is shown in Figure 6. Comparing these images to those from the subject pulley (Figure 4) confirms that the fibers in the subject pulley fractured in a manner consistent with classical brittle fracture due to overload.
Thus, this particular physical evidence does not rule out the possibility of impact failure. Admittedly, though, the absence of any striations also does not rule out the possibility of fatigue failure, as glass fibers do not generally exhibit the classic fatigue crack growth behavior common to other materials. Highly filled resins in fatigue typically fracture in a brittle manner without a striation pattern.12
Additionally, Quinn states that “nearly all glasses are not susceptible to classic fatigue crack growth, by which iterative cyclic loading to a crack causes damage nucleation, accumulation, and stepwise growth with periodic spaced striations on the fracture surface.”3 Consequently, the evidence provided by the fiberglass fracture surfaces can be considered neutral: it can neither confirm nor rule out both fatigue and impact as plausible failure modes. Further proving the point, one investigator in this matter performed fatigue testing of coupons cut from exemplar pulleys and was unable to identify any evidence of fatigue.
Hypotheses
Based on examination of the physical evidence, the most likely hypothesis for failure was impact with one of the other components in the ensuing events immediately after a rear-end collision. (This scenario would require failure of the engine mount to allow the engine and pulley to move forward and make contact with another component.) However, the other party in the matter argued that the most likely cause of failure was fatigue resulting from improper material selection, defective design, and a material defect (specifically, the distribution of glass fiber diameter was said to be too broad)—despite the lack of physical evidence. The first two arguments are addressed herein. The third argument is not addressed, as no evidence was presented to link fiber distribution with the failure mode.
Material selection
On the issue of material selection, it was argued that phenolic resin is too brittle and notch-sensitive for this application or design. However, the use of phenolics for such applications is widespread. In fact, phenolic resin parts have been used in automotive applications since at least the 1930s, primarily in electrical parts and other non-structural components.10 With improvements in manufacturing methods and a greater understanding of the performance of fiber-reinforced composite materials in the 1950s and 1960s, phenolics began to be introduced more widely throughout the automobile. The first phenolic poly-V power-steering pulley was released in 1985.13,15 By 2000, the use of phenolics for power-steering pulleys continued and the general the use of phenolic pulleys in vehicles was growing.4 The development of phenolic pulleys for air conditioner compressors11 and idler pulleys1 occurred in the early 2000s.
Other automotive applications of phenolics include the impeller and pump housing for the coolant pump and the tensioning pulleys and toothed pulleys for the coolant pump, generator/alternator, and air conditioner, and the toothed belt drive controlling the camshaft.6 Phenolics are also used for aircraft pulleys (for example, Ralmark Company manufactures phenolic pulleys which are designed to Military Specification MIL-DTL-7034).
The advantages of phenolics for this and the other under-the-hood automotive applications are detailed in the references,2,5,11,12,13 and they are in fact considered the “preferred materials for such systems.”12
To the point about impact performance and notch sensitivity, Fitts and Bessette5 addressed concerns about impact toughness, concluding that “the impact resistance of phenolics can be remarkably similar to that of some reinforced thermoplastics … Experience has shown that structures molded of phenolic materials can have good impact resistance if appropriate design principles are used … [A] significant improvement in impact resistance is possible with short fiber reinforcement while still maintaining the other attractive attributes of phenolics.” Hence, the argument of defect by improper material choice is unfounded.
Defective design argument
The opposing party also argued that the choice of a triangular mounting plate was inappropriate as it generated a significant stress concentration and therefore represented a design defect. The location of the crack origin at or near the apex of the plate was used to support this hypothesis. However, the initiation of fracture at this location is also consistent with impact and therefore inconclusive. In addition, the stresses during normal operation were determined to be negligible through finite element analysis (FEA), as discussed next.
Stress Analysis
To understand the stresses experience by the pulley in each hypothetical scenario (i.e., impact and normal operation), a series of stress analyses were performed using the finite element method. The 3-D geometry of a pulley was constructed in ABAQUS 6.12 software (Figure 7) and then meshed using 3-D continuum-type elements.
Basic, linear elastic material properties from the material data sheet were assumed. The triangular mounting plate was modeled as perfectly rigid, a reasonable assumption since the modulus of elasticity of steel (200 GPa) is 16 times greater than that of the phenolic resin. The plate was constrained against all motion (assumed to be fixed). In order to model the effect of preload, the steel mounting bolts were also modeled and given a preload estimated to be just over 13.3 kN using the “Maney Formula.”3
Load was applied using a continuous (and rigid) surface that provides multi-point (distributed) contact to simulate impact with the overflow tank. This surface spanned across the height of the pulley and provided, at a minimum, two points of contact. Belt tension was added by modeling the belt simply as a thin shell. The geometry of the belt—that is, the angles of the belt at the points where (1.) it comes into contact with the pulley (“leading edge”) and (2.) it loses contact with the pulley (“trailing edge”)—were determined using geometry reconstructed from a laser scan of an exemplar vehicle’s engine compartment.
In accordance with the ECM data (i.e., assuming the vehicle to be idling at the time of impact (no pulley acceleration)), a tension load was applied to the upper belt end in Figure 7. The bottom end was constrained against axial motion to provide an opposing force and maintain static equilibrium. In order to establish the operating tension on the serpentine V-belt, belt tensions were measured on an exemplar vehicle before and after replacement of its belt during regular maintenance.
Various simulations were performed to consider the effect of bolt preload, belt tension, and impact loading at various configurations. For the purposes of this analysis and due to uncertainty in the loading rate during an impact, a static analysis was performed. The following observations were made:
- The effect of preload is negligible. The tensile stresses are very small (20% of the reported tensile strength and 10% of the flexural strength). The only sizeable stresses are compressive and therefore not likely to initiate cracking (crack initiation in materials occurs in response to a principal tensile stress, i.e., on a plane normal to the maximum principal tensile stress16). Furthermore, the peak compressive stress is 54% of the compressive strength.
- Belt tension during idling also has little effect.
- Comparing the edge loading results to the flexural strength of the material suggests an ultimate load capacity of approximately 2050 N, with this force distributed along a portion of the pulley’s flange.
- The stress distribution around the bolt holes is consistent with the crack patterns documented above, predicting the initiation of both circumferential and radial cracking at both holes (Figure 8).
To test the theory that the pulley failed due to fatigue under normal use (second hypothesis), an additional analysis was performed. The peak stresses during normal operation would presumably occur during rotational acceleration of the pulley. Accordingly, this case was modeled by first removing the rigid surface and belt (and its boundary conditions and load) shown in Figure 7.
Next, a distributed load (traction) was applied to the pulley/belt contact surface in order to simulate the moment experienced by the pulley during acceleration. A moment value assumed by the other party was applied, as the actual value was unknown. The resulting maximum principal stress was again insignificant relative to the material strength (< 4%).
Conclusions
Early in the investigation of the accident associated with the pulley fracture, two competing hypotheses were proposed: (1.) fatigue failure due to defect and (2.) overstress failure due to the rear-end impact. The failure analysis conducted by the authors found no physical evidence to support fatigue.
No macroscopic evidence suggested a fatigue failure, and the microscopic evidence was found to be inconclusive. In addition, the arguments about material and design defect were unfounded and unproven. In fact, a review of the literature indicates widespread use of glass-filled phenolic resin for automotive under-the-hood applications. Stress analysis also demonstrated low stresses during normal operation, negating the design defect argument.
On the other hand, the evidence supporting the impact hypothesis was numerous. First, the ECM data indicated the engine was idling at the time of impact. Second, witness marks on the pulley itself suggested it contacted another object during the fracture event. The continuity of the witness marks across the various fragments of the pulley suggests the pulley was rotating at the time of the incident. Third, fracture of the engine mounts confirm that the engine (and the attached power-steering pump pulley) did displace during the incident, thereby allowing contact of the various components under the hood. This motion and contact is further evidenced by damage to those other components and witness marks on the nearest component, the coolant overflow tank. Finally, a thorough analytical and experimental investigation based on basic engineering and mechanics principles clearly demonstrated that the crack pattern on the subject pulley was consistent with bending failure due to impact. In fact, the authors’ impact testing nearly replicated the exact crack pattern on the pulley, as well as the witness marks on the overflow tank samples.
This case study illustrates the use of the scientific method in performing a root cause failure analysis.14,17 The authors (1.) collected data through visual and microscopic examinations; (2.) analyzed that data through fractographic interpretations and basic engineering analyses; (3.) developed hypotheses; (4.) tested those hypotheses through exemplar testing (not presented in this abridged version of the original paper), stress analysis, and additional microscopy; and (5.) selected a final hypothesis: failure by impact.
References
- Arai, H., Sakata, Y., and Mori, K. High-Performance Phenolic Resin Idler Pulley. SAE International, 2003.
- Arimond, J. and Fitts, B.B. Design Data for Phenolic Engine Components. SAE International, 1988.
- Bickford, J. Handbook of Bolts and Bolted Joints. CRC Press, 1998.
- Brylinski, T.T. Molding Advancements for Phenolic Automotive Components. SAE International, 2000.
- Fitts, B.B. and Bessette, M.D. Tough Phenolic Composites. SAE International, 1987.
- Gardziella, A., Pilato, L.A., and Knop, A. Phenolic Resins. Springer, 2000.
- Gauch, H.G., Jr. Scientific Method in Practice. Cambridge University Press, 2003.
- Gupta, P.K. “Fractography of Fiberglass.” In R.C. Bradt and R.E. Tressler, eds., Fractography of Glass. Plenum Press, 1994, 185-206.
- Hearle, J.W.S., Lomas, B., and Cooke, W.D. Atlas of Fibre Fracture and Damage to Textiles. Cambridge, England, 1998.
- Keegan, J.F. Phenolics in Automotives – A Historical Perspective. SAE International, 1983.
- Oka, H., Tabuchi, Y., and Yazawa, H. Development of Plastic Pulley for Automotive Air Conditioner Compressor. SAE International, 2002.
- Pilato, L. Phenolic Resins: A Century of Progress. Springer, 2010.
- Stull, A.E.G. and Chien, K.S. Phenolic Poly-V Power Steering Pulley. SAE International, 1985.
- Stumpff, P., Miracle, D., Donaldson, S., and Henry, S. Failure Analysis Procedures. 2001.
- Yoshizumi, F., Funatsu, A., and Yazawa, H. Development of Plastic Pulley by Injection Molding. SAE International, 1998.
- “Fracture of Plastics, Failure Analysis and Prevention.” In ASM Handbook. ASM International, 2002, 650-661.
- NFPA 921: Guide for Fire and Explosion Investigations. 2013.
- ASTM D6110-10, “Standard Test Method for Determining the Charpy Impact Resistance of Notched Specimens of Plastics.”

