Injection Molding Trials Gone Bad
But there are strategies for getting a project back on track…
Previous Article Next Article
By Mark Rosen
Injection Molding Trials Gone Bad
But there are strategies for getting a project back on track…
Previous Article Next Article
By Mark Rosen
Injection Molding Trials Gone Bad
But there are strategies for getting a project back on track…
Previous Article Next Article
By Mark Rosen
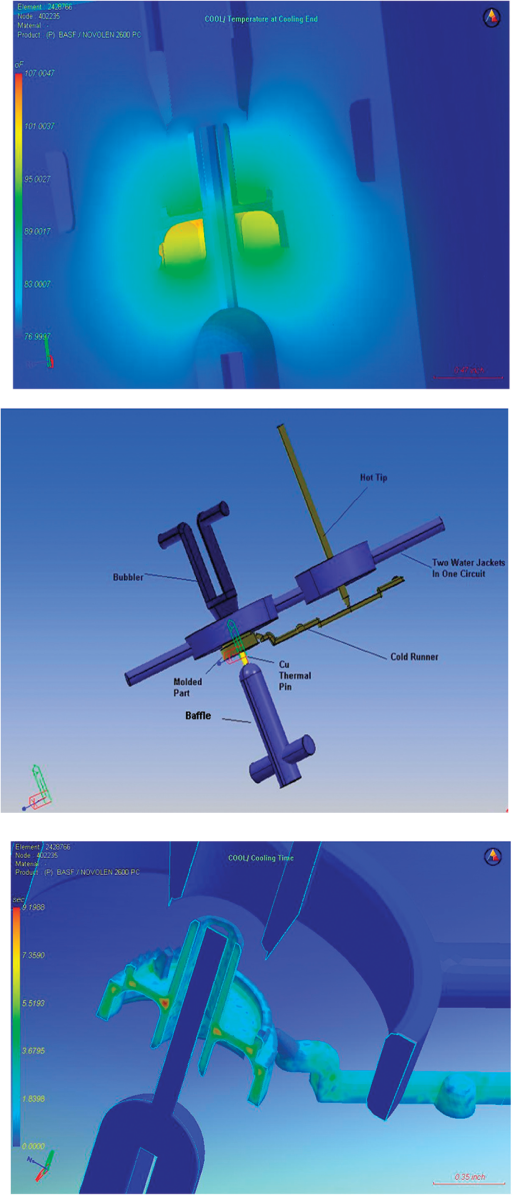
Figure 1: Filling analysis images, showing a mold layout and the effects of cooling design with a complicated cooling circuit (analysis run with Simpoe-Mold software, using 3-D meshing of the part, the cooling circuit, and the mold, for more accurate results)
“Taking short-cuts and using “educated guesses” to fix a problem often result in longer delays, butchered molds, and more costly parts.”
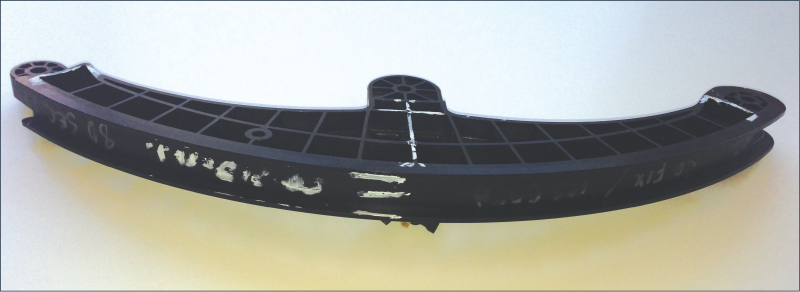
Figure 2: A long-glass fiber-nylon structural part having sampling problems with concentricity and critical dimensions; “quick fixes” without analysis—such as the toolmaker-suggested changes shown in white here—often don’t work and only make problems worse.
Figure 2: A long-glass fiber-nylon structural part having sampling problems with concentricity and critical dimensions; “quick fixes” without analysis—such as the toolmaker-suggested changes shown in white here—often don’t work and only make problems worse.
What’s the best path to take when injection molding trials result in unacceptable parts? The world of plastics injection molding is complicated and humbling—and even the most talented of teams have stories of projects which did not work out as planned. The interactions between part design, tool design, processing, and materials result in endless opportunities for unforeseen problems which can pop up during a sampling.
Over 25 years of experience in plastics consulting and injection-molding troubleshooting have revealed methodologies that have helped me diagnose the causes of molding problems—and develop effective solutions—for countless types of plastics parts. This article will present a brief overview of what’s worked.
Before the discussion of these methods below, it should be made clear that a few assumptions are being made:
- first, that the mold is functioning as designed (no jamming, the polish is correct, parts are not sticking due to unplanned undercuts, etc.);
- second, it’s assumed that an experienced part design review was done and no obvious design mistakes exist (this is often a big assumption); and
- finally, it’s assumed that the selected material cannot be changed.
Step 1: Collect Information to Best Understand the Problem
A. Understand the nature of the material
Understanding the behavior of the material is key to understanding molding problems. With an almost infinite number of different plastics materials, often important design mistakes are made due to designers and molders being unfamiliar with the molding characteristics of the material.
As a start to better understanding the material, processors should first consult available design and process manuals, and then follow this up with a deeper inquiry, with the following examples of questions to ask:
- Is the material unfamiliar to the processor?
- If so, is there a good technical contact who understands the material to assist with advice and questions?
- Is the material a stiff- or easy-flowing material? How are the surface cosmetics affected by fill time? Many materials process better at fast injection rates; some examples include polypropylenes, most TPEs, and liquid crystal polymers. However, other materials do not like shear; examples include materials with oil-based additives, flame retardants, long glass fiber-filled materials, TPUs, and PVC.
- How quickly does the material lose heat? Fast-cycling materials are more sensitive to flow hesitation. What’s the expected cooling time for the thickness of the part? Carefully study gate size and runner layout recommendations.
- Is material prone to warpage? As general rule, glass-filled crystalline materials tend to warp due to fiber orientation, while amorphous materials warp due to wall thickness variations.
- Does the material tend to off-gas during fill, and/or plug up vents?
- And is the material tough to eject? Certain materials such as glass filled PP and nylon can be a bit more “grippy” on the mold. In addition, processors often run higher pack/hold pressures to help maintain dimensions, which makes the situation worse.
B. Run a detailed filling analysis and compare findings to real-world results
This is an important first step to help understand if the part can be molded with a reasonable processing window. Significant part and tool design mistakes can often be discovered in this analysis. Some tips include the following:
- Use filling analysis results as a baseline to compare possible changes to the part, tool or processing.
- Use an analysis expert with the experience and time required to do this important step correctly. Budget this effort to allow for the running of various iterations to test different design ideas. This analyst should have extensive experience in part and tool design, materials, and processing (consider Figure 1, for example).
- Make sure the material data is correct, to ensure accurate results.
- Pay close attention to gate freeze times, required fill pressure, and venting requirements. Also, pay attention to flow hesitation and high velocities at end-fill.
- Understand the nature of the material when interpreting the results and setting up the process settings. This is a critical component of any analysis.
- When should you include cooling lines in the filling analysis? There’s no easy answer; it depends on many factors—typically more common for parts molded with crystalline materials, or where cycle time, sink, and warp are key issues.
- And when should you model a hot manifold in the analysis? It’s best to do this if possible. Have the processor run the mold to calculate the pressure drop in the manifold and compare it to analysis predictions. (Watch out for fast-cycling materials such as nucleated PP, stiff-flowing materials such as low-MFI polycarbonate, and small valve gates with long drops.)
C. Look for clues on the process setup sheet for the trials
The troubleshooter should speak to the processor, ask a lot of questions, and listen carefully. Before studying the setup sheet, the following items should be checked:
- Make sure the mold sampling was run long enough for the tool temperatures to stabilize (this varies by size of mold).
- Ask about nozzle type and its bore diameter.
- Identify the water temperatures settings and ask for an actual reading of the mold cavity and core temperatures as a check. (Also, get an air shot temperature reading.)
- Know the shot size for the press and the shot residence times.
- If a hot manifold is being used, find out the temperature settings for the manifold. Make sure setup sheet has the nozzle pressure (not the hydraulic pressure).
- Finally, make sure the actual material grade and lot number used for the sampling is recorded.
The next sub-step is to compare the actual process settings to those which are recommended by the filling analysis:
- Slower fill times can indicate venting issues and filling imbalances.
- A too-short pack and hold time may indicate that parts have ejection issues. And the use of excessive pack/hold times and pressures can indicate incorrect gate location(s) or sizes, issues with part design related to sink or warpage, weak weld lines, problems with cooling related to part warpage, or leakage of the check valve on the press.
- An excessive time required to plasticate the shot can indicate a problem with a worn screw. In addition, cooling times may need to be extended if the press is plastication-time-limited.
- With excessive cooling times, the processor may be trying to correct warpage or hold critical dimensions. This adds stress to part and increases production costs.
- Too high of a temperature may indicate restrictive nozzle/runner/gates, weak weld lines, too long a flow path, or inadequate clamp tonnage. Too low a temperature is typically used to speed up cycle time, but the part can have higher warpage, less surface gloss, increased surface cosmetic issues, more visible weld lines, and reduced mechanical properties. If the nozzle temperature is too high, the nozzle or sprue may be too small. Surface cosmetics can sometimes be affected if the nozzle temperature is set too high relative to barrel temperatures.
- If the fill pressure is higher than expected, first find out the actual pressure drops in runners and gates. Check if the gate sizes, nozzle diameter, and sprue are adequately large for the material. For a hot manifold, make sure there are not higher thermal losses in the hot manifold and gates (this is more common with stiff flowing materials and fast cycling PP). Next, check the venting on both the cold runner and the mold. And finally, make sure wall thicknesses are correct.
The design and manufacturing of a well-functioning injection mold requires tremendous expertise and skill. Many tool designs end up being compromised in an effort to save tooling costs. In other cases, a problem may just be a mistake by the tool designer. How were important decisions related to shrinkage, runner and gate sizing, venting, part ejection, and cooling established? Examples of some important items to discuss are:
- Inadequate cooling can result in hot spots which result in higher sink, warpage, and longer cycle times.
- Inadequate venting will result in higher fill pressures, possible short shots, imbalanced mold filling, issues with surface cosmetics, and the need to slow down the fill times. Try to use active vents such as movable pins or parting lines. Don’t forget to vent the runner.
- Molds with inadequate or poorly designed part ejection can result in scuffed parts, slower part ejection, longer mold-open times, higher residual stresses, and longer cooling times. Parts may stick to the wrong half of the mold during ejection; sometimes mold temperatures are adjusted to help the part stick to desired side of part. This can result in new problems such as warpage or added internal stresses.
- Too small or wrongly designed gates can result in underpacking of part, higher fill pressures, and surface cosmetic issues near gate(s). Runners which are too long, or the wrong cross section, result in higher pressure drops. Multi-gate, multi-cavity, and family mold layouts with improperly designed runners can result in higher fill pressures and overpacked and/or difficult-to-fill parts.
- A lack of mold interlocks or guides can result in inconsistent wall thickness, which will affect the filling of the parts. Softer tool steels can sometimes force the processor to use slow fill times and lower pack pressures; this can affect part dimensions. And bad shut-offs and/or slender cores can sometimes force the processor to also slow fill times and lower pack pressures.
Step 2: Test Ideas Before Making a Final Decision
In the previous sections, there was quite a bit of effort placed on understanding the cause of the molding problems. Once this information-gathering stage is complete, the next step is to start exploring creative solutions to the problem. The goal is to find a solution which has the best chance of working with the lowest cost impact on the project:
- First, see if the molding problems can be fixed by processing changes. Make sure the press is capable of running the mold. In some cases, simply switching to a press with a faster injection rate, higher clamp tonnage, or high fill pressure can solve the problem.
- Do not makes changes based on a quick meeting with the toolmaker or processor (see Figure 2). Test ideas with flow simulation to try to validate theories, and compare the results to analysis or the original part.
- Focus on pressure losses in runners and gates, and check the pressure limits of the press. Try to allow at least a 10% margin to allow for variations in the process.
- Be careful with adding gates. Sometimes this works, but be careful that a more complicated flow pattern does not result in problem venting, weld lines, or overpacking.
- If the part design needs to be changed, do not focus only on steel-safe changes (removing steel). Longer term, this results in a more expensive molded part with potential new problems such as sink or warp.
- Discuss theories with your team for input and suggestions.
Step 3: Identify the Most Cost-Effective Path Forward
This means developing corrective strategies with the goal of minimal changes to tooling. When a final corrective plan has been decided on, it’s best not to try too many changes at once. Some of the simpler changes, such as modifying the runner or gate, or adding some venting, or a minor change to a part geometry, may be all it takes to get a sampling trial back on track:
- Start with changes that have the likelihood of greatest impact at the lowest tool rework costs. These usually relate to changes in the runner, gates, and nozzle in the press.
- Make sure that the tool is properly sampled on a press which is calibrated. Provide enough time in the sampling for the tool to reach steady-state operating conditions.
- And run a design-of-experiments (DOE) molding trial to help establish a process window with the new changes.
In summary, this article discussed a methodology to help get problematic injection-molded sampled parts back on track. The process includes a careful analysis of the part and tool design, and an understanding of the material flow behavior. It’s also critical in the process to speak to the design and processing team and technical personnel familiar with the material. In addition, mold-filling analysis is recommended throughout this process, first to establish a base-line comparison, and later to test ideas. Taking short-cuts and using “educated guesses” to fix a problem often result in longer delays, butchered molds, and more costly parts.
About the author:
Mark Rosen is principal of Corex Design Group Inc. (www.corexdg.com; email: mrosen@corexdg.com; phone: 201-891-1650).